In this article we provide step-by-step instructions on how to setup the Windows firewall on your host machine for use with the SNIP NTRIP Caster. We will be “adding a rule” to the firewall to allow the NTRIP traffic to pass. These instructions are designed for those with little to no familiarly with firewalls and how they operate. [If you are experienced in this area; simply open the ports SNIP will be listening at (typically 2101 and 2102) for inbound TCP/IP traffic.]
Keep in mind there are typically two separate firewalls that this must be dealt with. Here we are adding a rule to the local host machine firewall. Unless your host machine has a direct static IP address on the internet, there will certainly be a 2nd device (a combination router and firewall) that must also be configured to pass in traffic from outside your office environment and hand it to the host machine running SNIP. Even in the case of a direct static IP, such a router may exist with firewall rules you may need to edit. The setup process for that will vary with the ISP provider you are using but follows somewhat similar rules.
Hint: You can also test if your SNIP NTRIP Caster is available to others on the public internet by using our utility tool at http://monitor.use-SNIP.com and entering your IP or URL there. If that tool can obtain your Caster tables, so can any NTRIP Client rover devices.
Background
Modern firewalls found on Microsoft Windows devices all follow somewhat similar rules of conduct. In general terms, all in-bound connections (devices outside of your host machine that may try to connect to you at any time) are blocked by default. In the detailed steps below you will see that there is a bewildering and long list of existing exceptions to this so that various “trusted” programs can operate. We will add one more rule to this list so that external NTRIP devices can be allowed to reach your Caster. In contrast to this, all out-bound connections (connection that are started by your host PC to another remote computer) are generally allowed by default. This logic is used on both the home and public network settings you will find, a difference we will not need to deal with here.
A common exception to the general allowed rule is to detect and trap traffic directed to well-known problem sites. You may find this with “parental control” internet filters or with some corporate firewalls that wish to prevent the use of selected sites or prevent unusual ports from being used.
Firewalls rules can be made to filter on the IP used at either end, the port used at either end, the application program to be used, the protocol used (TCP or UDP), and on any combination of these elements. New connections that match the defined setting rules can then either be blocked or allowed to flow.
An interesting detail about TCP/IP connections to know about (which is what NTRIP and other protocols such as HTTP use to transport data) is that there are TWO ports being used at all times. These ports can be any value from 0 to 65535, but some best practices do apply (in other words, regarding well known ports). In a similar way there are two IPs being used in the connection. And there too some best practices and convention apply.
Explaining this with a practical example: When you type https://amazon.com into your local web browser, the URL “amazon.com” is translated into an IP address using your local DNS service. When this was just done here, the value 52.94.236.248 was returned (because of regional load balancing you will likely get a different value). Because the URL has “https” as the protocol the browser knows to use port 443 (which is the ‘well known’ secure port). If we had typed http, then port 80 would be used as the ‘well known’ web port. So under the hood, your browser is connecting to “52.94.236.248:443” to reach amazon. But where is your browser connecting from? That’s is the other IP and port. In the case of this machine, its local IP (provided by the office DHCP server) is 192.168.2.105 and port to be used is just picked at random from a unused value range, typically a value larger than 32000. In fact every new tab and connection you open will get a different port number each time. So the connection might be from “192.168.2.105: 35000” and to “52.94.236.248:443” and the next page or tab might be “192.168.2.105: 35001” and to “52.94.236.248:443” and so on. The important insight here is that the connecting party is using a random port at its end to connect to the “well known” port at the other end. The same thing occurs with NTRIP Casters! Note that the remote party connecting to your SNIP Caster used a random port, it did not use port 2101 to reach your Caster that is listening on port 2101.
One final minor detail is that IPs in the range of 192.168.x.x are not “routable” and are used only for private internal addressing (read: local offices). The range 10.x.x.x is another such example. These ranges are reused by multiple parties without conflicts because when they “go out to the public internet” a Network Address Translation (NAT) process occurs in the router they use. In the case of the machine this article is being written on, 192.168.2.105 is translated to be 23.2×0.2×4.216 and a new port value is used. That is the value of the connecting IP and port that the other party will see. In fact it has no insight at all into the original IP and port used to make the request. It is the responsibility of the NAT device to route the traffic between these two endpoints.
And, just to round out this background; these dynamic and static values will change with time. When we setup firewall rules we want to be secure but also to minimize such routine changes from causing us to revise the firewall. So as a rule we do not setup rules that depend on in-bound IPs or on DHCP assigned IP or port values. The exception to this being the IP and port where the SNIP NTRIP Caster is listening.
Useful Hint: Want to learn what your public IP is from any device with a browser? Go to this page to get the current value: https://whatismyipaddress.com/
Launching the Firewall Tool
With the above background out of the way, we now open the firewall tool and create the new rule. The hardest part of this is finding where, in Microsoft’s market driven wisdom, they have hidden the “Advanced Firewall” dialog in your copy of MS Windows. It was once easily found in the Control Panel, but after Windows 7 it has increasingly been hidden by “helpful” new dialogs apparently intended to stand between you and being productive. If you can get to “Windows Firewall” you can activate it from the Advanced Setting button along to left side. If you type “Advanced Firewall” in the search bar for Windows 10 or 11 it will display an option to bring up the Windows Firewall from which you can click on the Advanced Settings button.
Once you finally have the dialog up and running it will look like this:
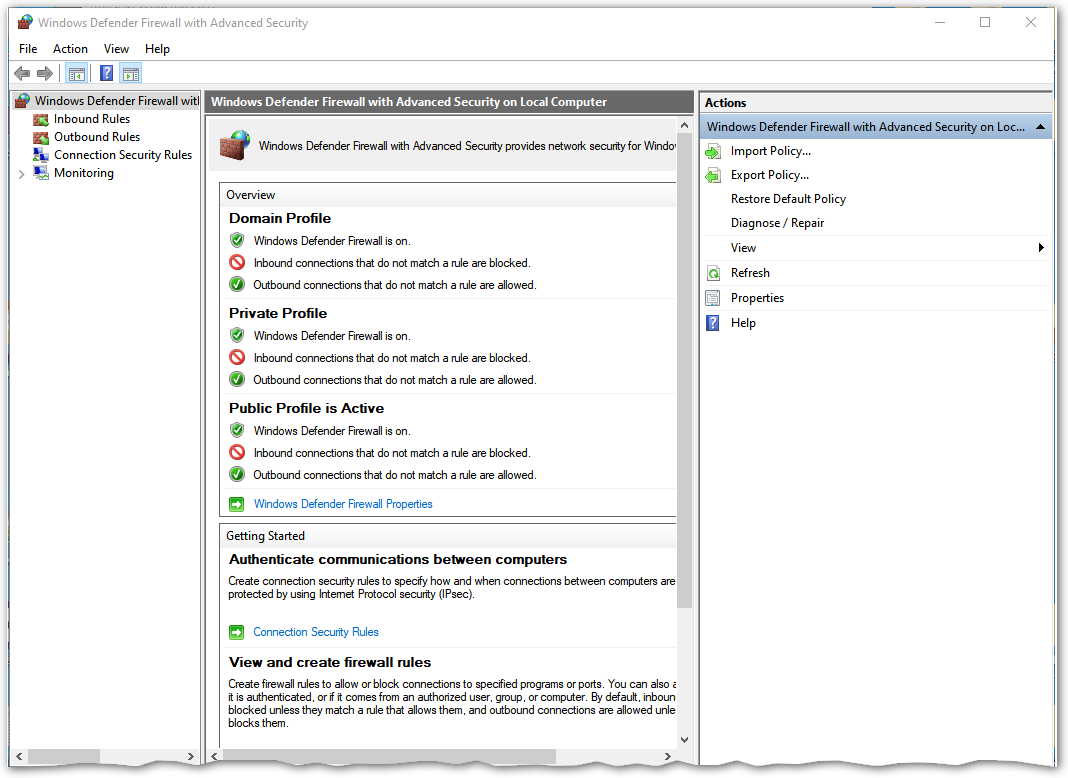
If you are not familiar with this dialog style, this is the Microsoft Management Console, a generic tool used to manage many interesting advanced features of your machine. It is just a container class, and you are expected to learn to resize it to be larger to see all the various columns of data it displays. It is apparently beyond their programing ability to remember what you sized it to the last time and where you placed it, so you will need to do that every time you open it.
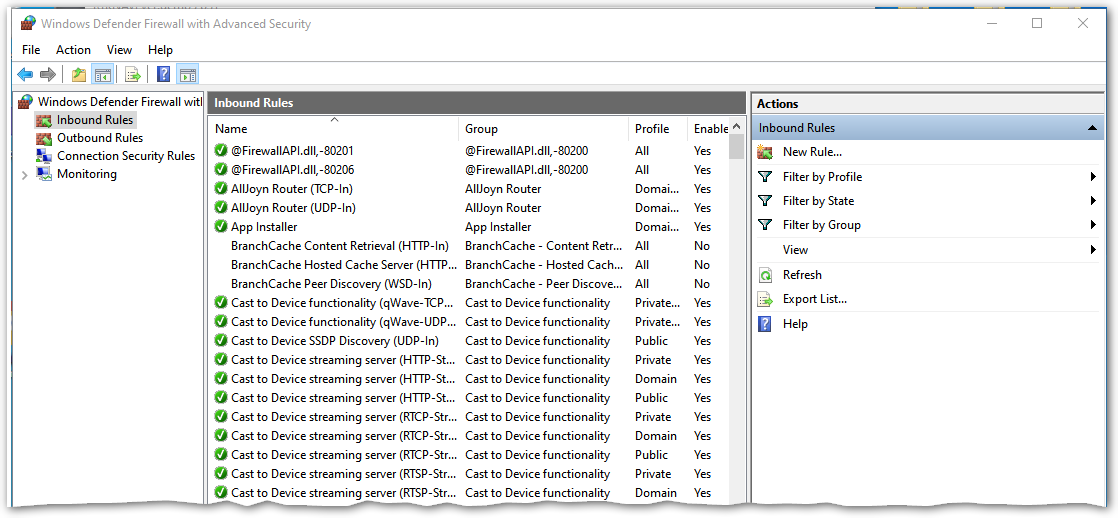
If you click on “Inbound Rules” (first item in the tree view along the left side) the center section will show a large set of firewall rules. The green check box indicates a rule is active. An inactive rule is grey, has no icon, or has an X image there. You can sort rules by name etc. by clicking on the heading. Now would be a good time to greatly enlarge the dialog so you can see the many additional headings.
Setting up a new Rule for NTRIP
To create a new rule, first make sure that you are displaying the Inbound rules. If not, select that from the tree view on the left side. Then press “New Rule…” found under Action along the right side of the dialog. You will be presented with a new empty rule as shown below. There are five simple steps to complete this new rule.
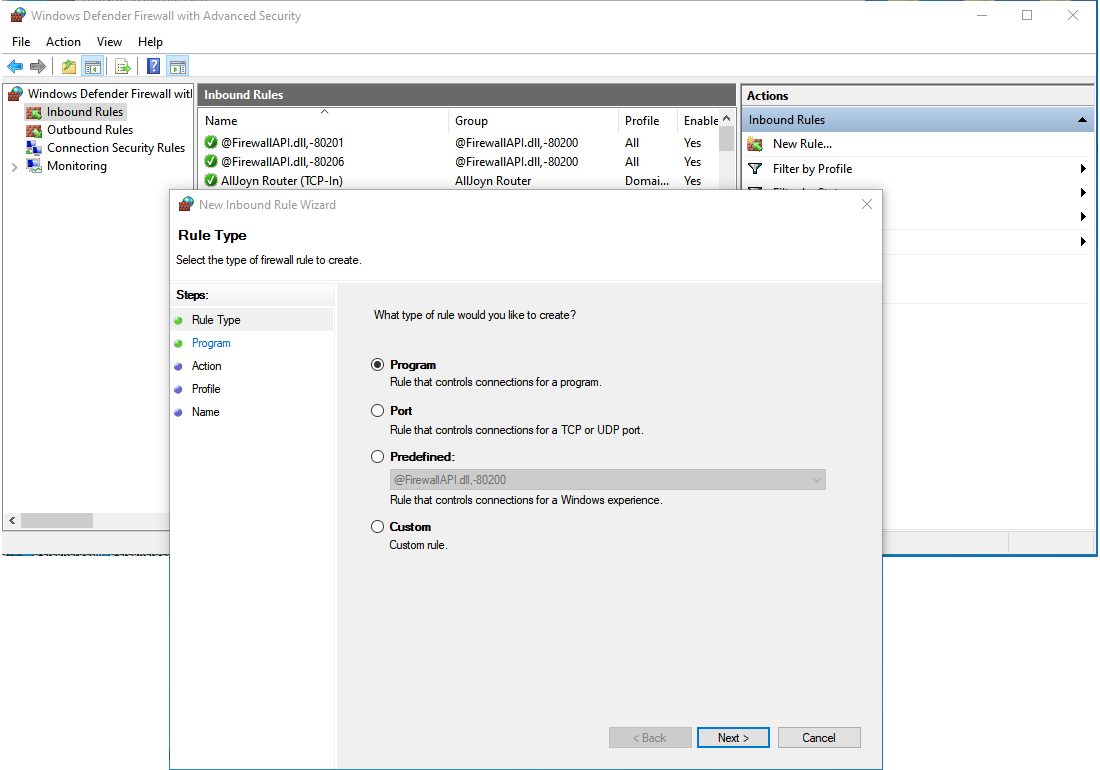
Step #1, Creating a PORT rule
Here we will create a Port type rule (not a Program rule). Select Port in the above dialog, then press Next.
Why not a Program rule? Because we want this to work for all editions of the SNIP Caster, not just the current one. If you were to create a program rule, you then pick the program of interest, Microsoft then does a hash of the program exe file (simpleNTRIP.exe in this case) and stores that value as indicating the “chosen” program. If the program ever changes (such as from one of the SNIP periodic updates), then this value changes. So any time you updated SNIP, you would have a problem with such a rule and have to update it. Microsoft’s original intent here is to detect a program that might have been changed by being corrupted or replaced. By choosing a port rule we avoid this problem.
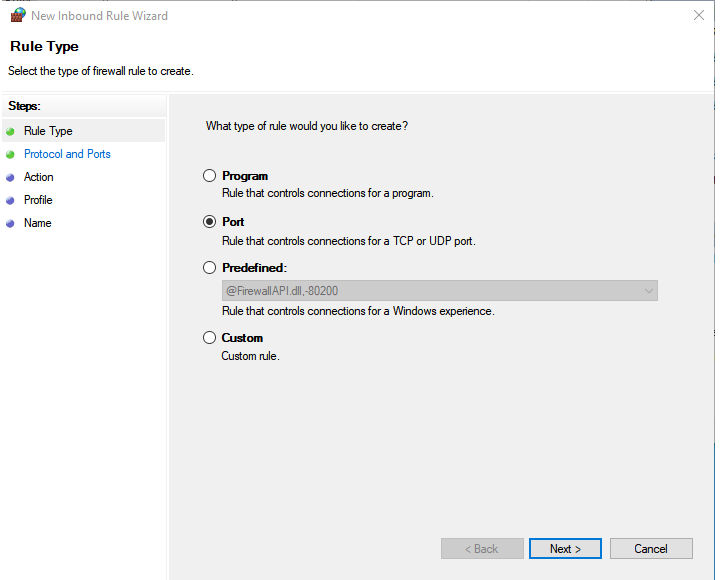
Step #2, Set Protocol and Ports
We next need to set the protocol to use TCP/IP (not UDP) and we need to set the Specific local ports to be where our copy of the SNIP NTRIP Caster will be. Set the data as per the below unless your Caster will be on a different port than 2101.
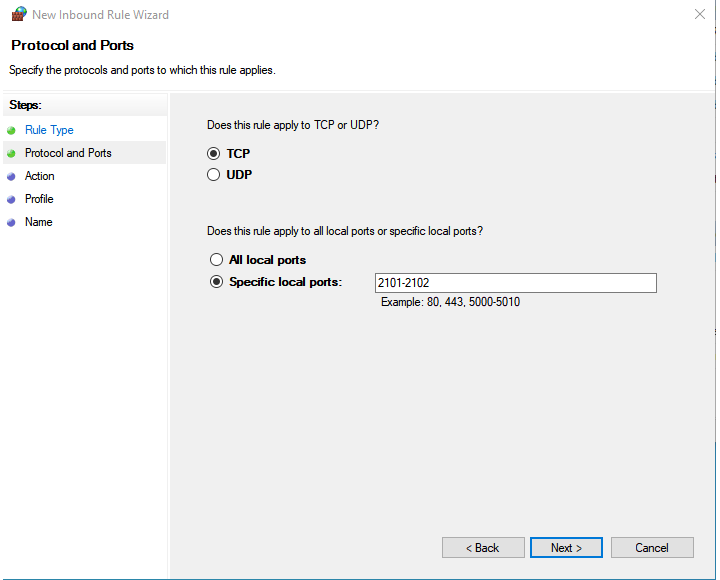
Why also port 2102? Because in the future models of SNIP (due out Q3 of 2024) all models (Lite, Basic and Pro) will also support secure Caster connections and 2102 will be the default port used for that. So we are recommending that you set up for that now.
If you wish to run your Caster on some other port, simply enter that value here. Also see the remarks on AVL servers (a Pro model SNIP feature) at the end. You may want to enter that port here as well. Or, you can enter it as its own rule.
Once this has been entered, press Next.
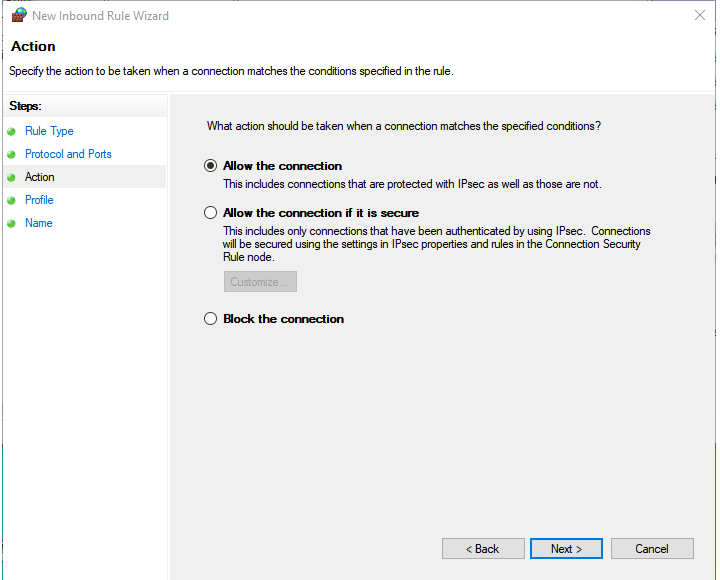
Step #3, Set Action
The default behavior is to allow the connection to occur, so there is nothing to change on this step of the dialog. Simply press Next.
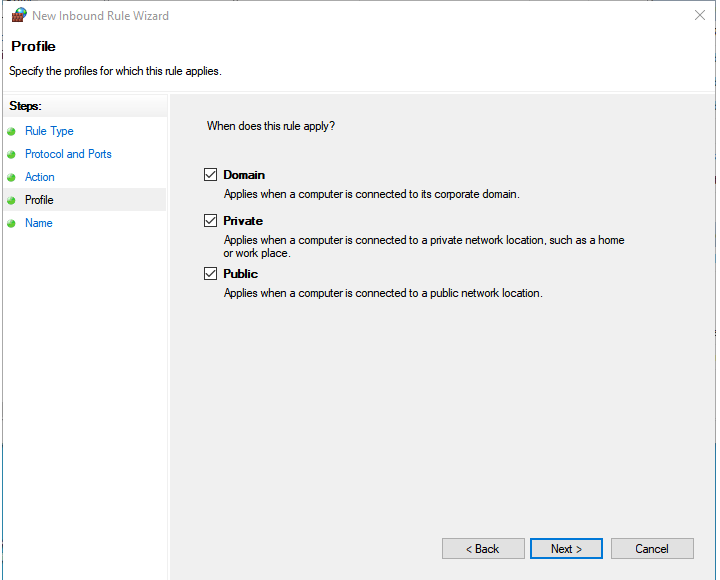
Step #4, Domain Profiles
We wish to enable this rule on all the different domain profiles, so ensure all the checkboxes are checked. Then press Next.
Step #5, Name the Rule
We are nearly done, we simply have to name the rule. You can enter anything you wish here but a name with NTRIP or SNIP in the title is suggested. We suggest that you use “Allow In-Bound NTRIP on 2101-2102” as it is descriptive but also shows up at the top of the list when the rules are sorted.
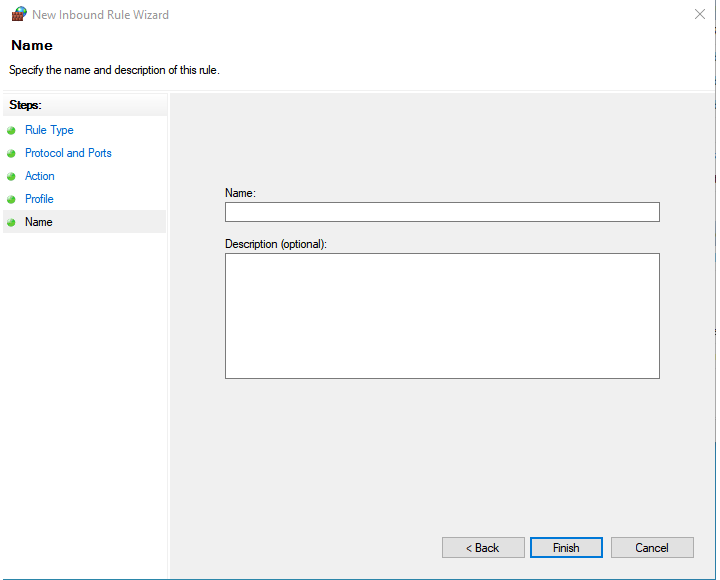
Press Finish and the rule will be created and shown in the table.

That’s is all there is to it!
Reviewing the rule
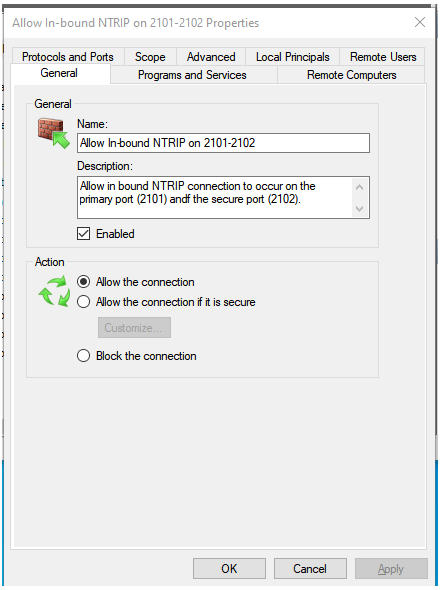
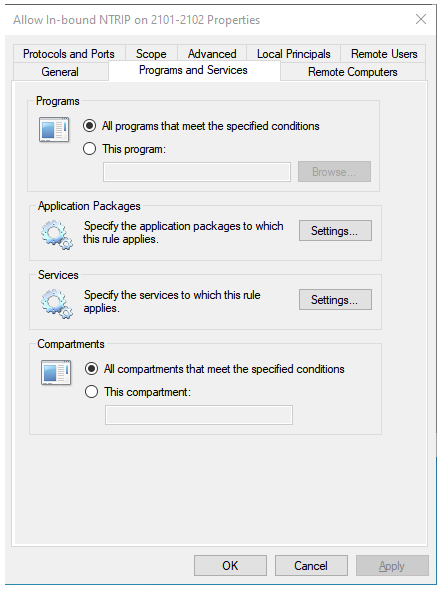
When we created the rule, we used a multiple-step Microsoft wizard to enter the data fields. If we double click on the rule we can see (and edit) this same information in a somewhat different format. The same five steps can be seen by clicking on the tabs shown for the rule. For completeness, here is the data shown in each tab.
The General Tab, showing the rule name and action.
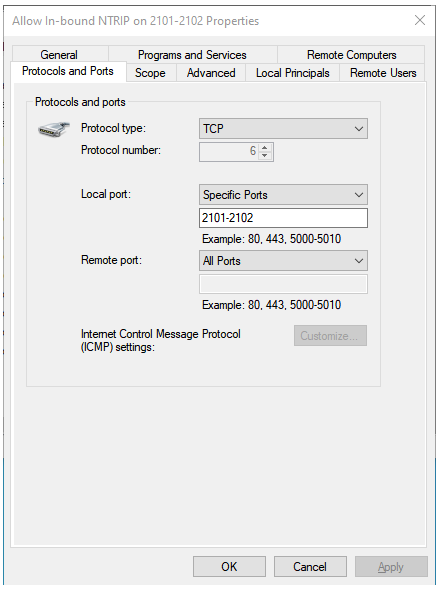
The Protocols and Ports Tab.
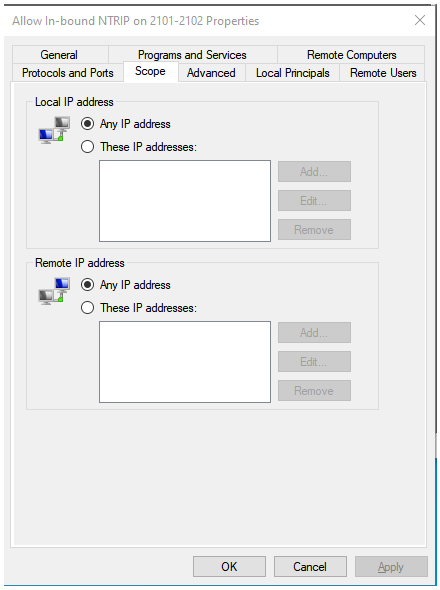
The Scope Tab, showing what IPs this rule applies to (all of them).
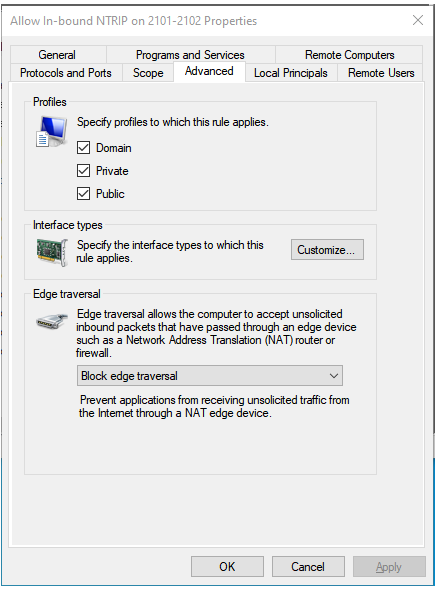
The Advanced Tab, showing the three profiles the rule applies to (all of them).
The Programs Tab, showing that the rule is not attached to a specific program instance.
If your rule looks like the above, you have correctly created it. Keep in mind it is easy to just right-click and remove a rule (or to disable one) when there is need.
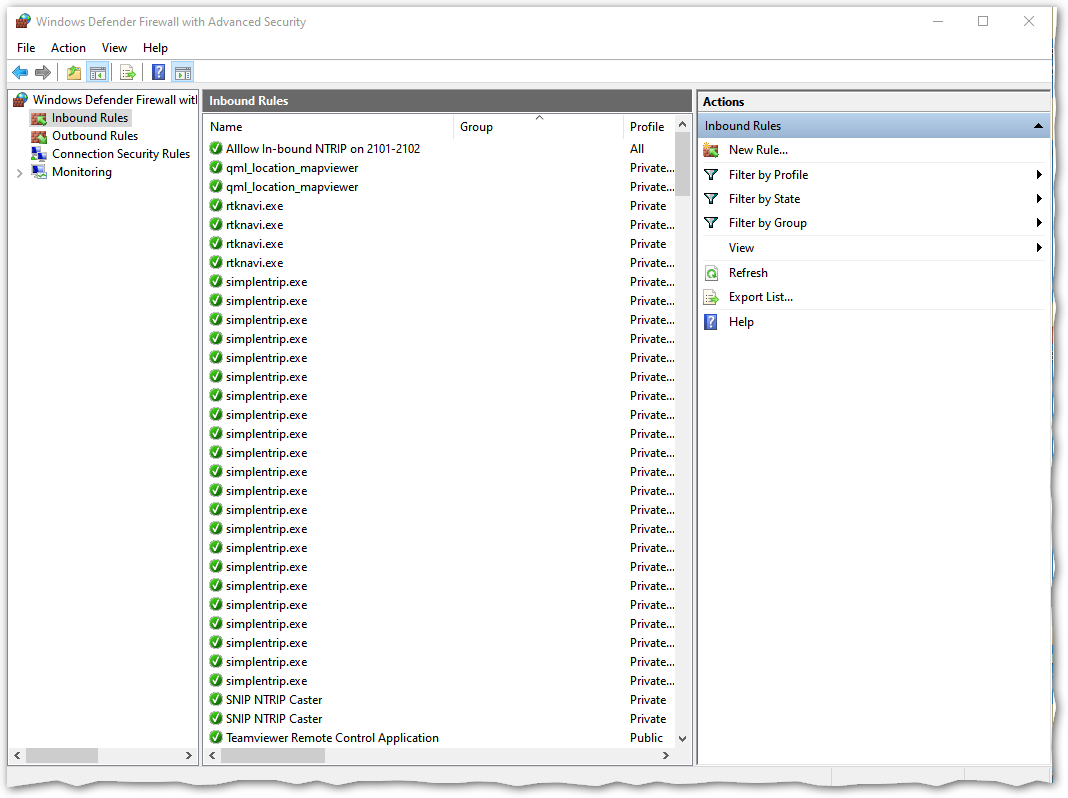
A common mistake, too many rules…
Below is an example where several “program” type rules were created, one every time a new copy of SNIP was deployed on the host machine. This is not harmful in that it causes no operational problems, but is it wasteful. All of the “simplentrip.exe” and “SNIP NTRIP Caster” rules below can be safely removed as the single rule at the top of the page (“Allow In-bound NTRIP on 2101-2102”) is all that is required.
Use with AVL (a feature on SNIP Pro models)
If you are running an AVL server on your Pro copy of SNIP, you will need to open a firewall rule for that service as well. You may also need to create a similar rule to open the port on the public IP as well (if you allow devices outside of your local office to access the AVL data feed). See the articles AVL Tab and AVL Server for more details about this feature.
Related Articles
Please see the article Setting IPs for AWS deployments for similar details targeted for those running a copy of SNIP on any AWS VM machines.