The pushed-in reservation list allows a SNIP operator to reserve a mountpoint name (mountPt) for future PUSH-In connections from specific devices which they wish to allow. Once set up, only an NTRIP Server with the correct password and IP address combination will be able to PUSH-In with the preconfigured mountPt name. This feature is accessed from in the PUSH-In tab. The reservation process supports both NTRIP Rev1 and Rev2 style connections.
Consider the following usage example:

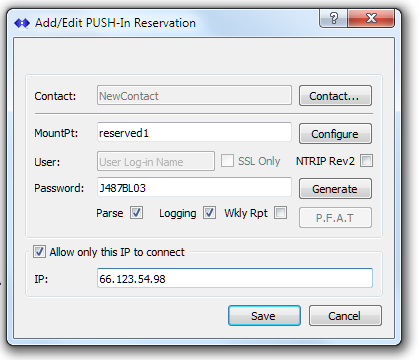
In this case, a a remote data source (from an NTRIP Sever) can only push in from the IP 66.123.54.98 and using the password J487BL03 as “reserved1“. [Recall also that mountPts are always case sensitive] This feature allows the SNIP Caster operator / administrator to prevent other users from establishing a pushed-in stream using a reserved mount point name unintended. No other mountPt with this name will be allowed on the SNIP node, hence the term reservation is used to describe this feature.
The greyed NTRIP Rev2 features shown in the above are discussed near the end of the article.
Core Features
The Configure button is used to create the normal Caster Table Entry to be used with the stream (or to allow SNIP to define it for you when the data stream has RTCM3 content and is parsed). The Generate button provides a unique strong random password for the connection. Be sure to share this password with the remote party sending the data.
An important feature of the reservation system is that the Parsing and Logging options can be set for each individual data stream. This allows having different values for each stream, rather then the system-wide default start up values for new streams which the check box along the right side of the PUSH-In tab display. A SNIP node could, for example, elect to automatically parse all streams as RTCM3 content, while also allowing a specific reservation stream with CMR data content to not be parsed.
The reservation systems exists “on top” of the normal NTRIP protocol. That is to say; other PUSH-In connections from NTRIP Servers are still supported using the normal single (common) password system which can be accessed with the Set Up… button. SNIP device operators can elect to use this feature or not as best meets their needs. As a best practice, operating a SNIP node with reservations to known IPs addresses, each with with unique passwords, is to be preferred. If you wish to disable the common password connection method, simply select a random password no one else knows.
To access the reservation list, go to the “pushed-in streams” tab, and the list can be seen on the right hand side. Right-clicking on the panel will bring up the context menu to Add…, Edit…, and Remove an item from the list.
Whenever reservations are present, a sorted list of the defined reserved mountPts is shown. When a given reservation is in use, a small check box is shown next to it. As reservation connections come and go (and attempt to log on), the console log displays the outcomes in the normal way. There is no limit regarding how many reservations can be created (the number of simultaneous active data streams is still limited by your SNIP license). Holding the mouse over a reservation in the list brings up a summary of its past connections, including the date of the last connection.
When reservation entries exist, you can hover the mouse over each entry to learn more details. Reservations which are being actively used are shown with a check mark at the top pf the list. For nonactive reservations, the number of days since the last usage is displayed in the tool tip. Reservation which have NEVER been used are also noted.
Only Basic, Pro, and Enterprise models of SNIP are able to use the pushed-in reservation feature. This feature is disabled for Lite model users.
Supporting NTRIP Rev2 Connections.
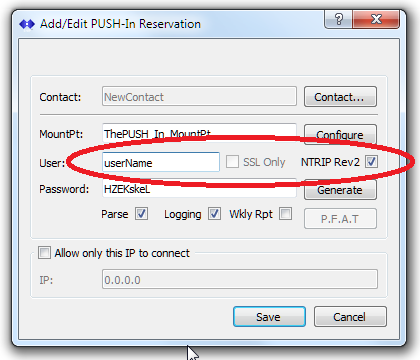
SNIP supports selecting either NTRIP Rev1 or Rev2 style connections for each reservation. The default format is to use Rev1. The Rev1 connection format is overwhelmingly more popular than the Rev2 in the marketplace at this time, and many low-end device only support Rev2. The key controls used to enable Rev2 are circled in red below.

To enable a Rev2 style connections in a reservation, simply check the “NTRIP Rev2” checkbox. Then provide a suitable userName to be used (as well as the password). These values are case sensitive. Share these values with the remote Base Station operator and remind them that only a Rev2 style of connection will be allowed.
Unless this is checked, the connection will be presumed to be in the Rev1 style. The Rev2 connection style feature is disabled for Lite model users.
The Contact… button will be used to associate the reservation with additional meta data such as a contact name and phone number. This will be part of a future SNIP release with increased support for user accounting details. The SSL and Weekly Report controls are also planned features which are not released at this time.


