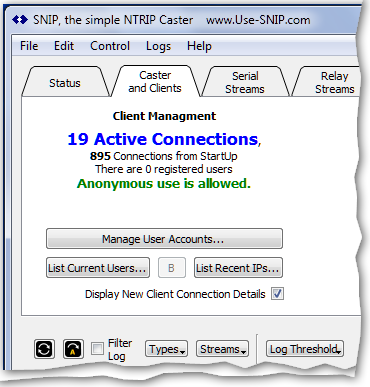
Client Management (located under the Caster and Clients tab on the left side) is how you control how others can connect to your SNIP caster and obtain data.
Update: The creation and management of new user accounts is now handled by new dialog which is part of the general Rev3 release. See this article for usage notes. The information below is applicable to older Rev2 releases of SNIP. Updating SNIP to the most current release is easy, always free, and fast – just use the menu item Help ⇒ Check for update…

You can operate your caster in either an open mode (Anonymous access) or a closed mode (registered users only); each has certain advantages.
Open Mode
- Easy to set up (default behavior out of the the box).
- No hassles with user support issues over user/password issues.
- But, no ability to track or restrict individual users by account.
Closed Mode
- Each User will need to have a User Account account which you must create for them.
- Each User Account can simultaneously connect to your SNIP Caster as many times as you allow.
- New Users require your assistance to create an account
- Ability to track or restrict individual users by account.
- If the Advanced User Management Plug-In is present, you can associate User Accounts with Customer Accounts and restrict account access and use in a wide variety of ways.
If you are using SNIP for a small network such as WiFi with a short baseline on a farm, for your drone club fly-ins, or for a small survey team in the field, then using the open mode may be the easiest. Choose the closed mode to allow tight control. This mode is best used by operators with public static IP addresses (and are therefore always subject to internet attacks) or by those who do not care to share their data streams with others.
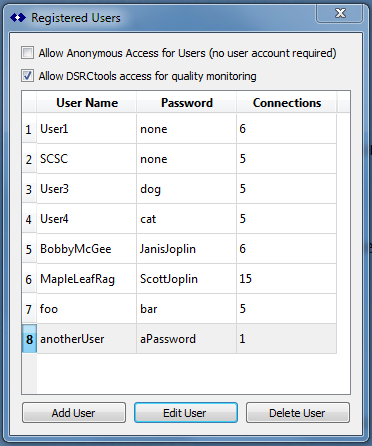
The mode is controlled with the check box labeled Allow Anonymous access for Users. Check this box if you wish to use the open mode. The current mode is always displayed in the summary line for client management.
The check box labeled Allow SNIP support team access for quality monitoring is used in the enterprise edition of SNIP to enable 24/7 stream monitoring. It also has value when our support staff is debugging a remote SNIP installation. There is no harm in unchecking it, and SCSC will not use these accounts without your express consent.
Check Boxes
On the main tab window are three check boxes that control the level of detail presented on the console log. Their use is as follows.
Show Connection Details
Checking the Show Connection Details box (and setting the console log threshold to minor) allows seeing the text of the connection submitted by each NTRIP Client. This is very useful for debugging connection issues. Many SNIP operators simply leave this checked all the time.
Show Raw Data
Checking the Show Raw Data box results in all data sent by all clients being displayed on the console log. It is intended for short term debugging of problem client connections where you wish to see precisely what they are sending to the Caster. The data is displayed in both Hex and ASCII formats.
Loose NMEA $GGA
Checking the Loose NMEA $GGA box instructs SNIP to take additional processing steps to detect and correct ill-formed $GGA inputs. Bad check sums and missing line terminations are overcome as well as other common encoding mistakes. Check this box if you have users who cannot correctly send $GGA sentences. This option requires additional processing for every client sending in data+, so as a best practice it should not be checked unless needed.
Update: The creation and management of new user accounts is now handled by new dialog which is part of the general Rev3 release. See this article for usage notes. The information below is applicable to older Rev2 releases of SNIP. Updating SNIP to the most current release is easy, always free, and fast – just use the menu item Help ⇒ Check for update…
Adding New Users
If you elect to have a closed network, you will next want to add some users. This is a process you will return to every time you wish to grant access to a new party. Users are added in the Registered Users dialog shown below. You can reach this dialog from either the Caster and Clients tab or the Menu item Control and the sub menu item Edit User Accounts…
Add a user by pressing the Add User button. Modify an existing user by pressing the Edit User button. Remove an existing user with the Delete User button. A confirmation dialog will be presented to confirm the deletion.
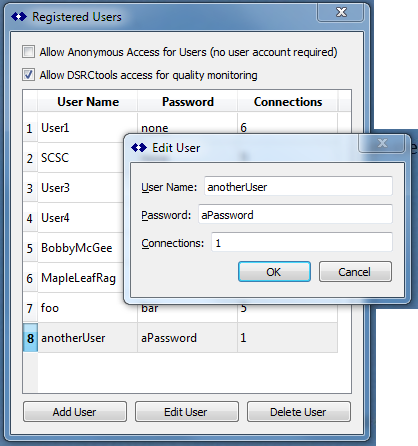
When adding or editing a user the Edit User dialog seen below is presented. Enter the user name, and the password you select. The number of connections refers to how many simultaneous connections this user can have one at one time, not how many times they can connect or for how long. Each user will need one connection for each stream they are using at the same time. The default value is 5 connections.
Please keep in mind that the user string and the password string are both case sensitive. Both of these terms must be one word (i.e. no white space is allowed), and certain characters are prohibited because they conflict with the NTRIP protocol (:;/@#).
Hint: The Edit User dialog displays the passwords for your users in plain text. As the owner / operator of this SNIP node, there are no secrets from you. You will find this feature very helpful when your users contact you after having forgotten the password they loaded into some field device months ago which they can no longer recall.
Note: User Names, passwords, and mountPt names are all case-sensitive strings.
Viewing and Tracking Connected Users
On the Caster and Clients tab …
In the summary line for client management is a count of how many client are currently connected. This is also shown in the status bar at the bottom of the application window. A count of how many client connections have occurred since the Caster was started is also displayed in the tab.
The List Current Users… button provides a detailed report to the console regarding how many users are currently connected to the Caster.
The List Recent IPs… button provides a more report to the console regarding how many IPs currently connected to the Caster.
Both of these buttons provide different details such as how many times a given user has logged on, how much data they have consumed, what NTRIP Client software they are using, etc.
Hint: When new users are unable to connect to your caster (the most commonly reported issue when operating any model of NTRIP Caster), go to this tab and check the check box “Display New User Connection Details” and watch your users attempt to connect. This usually the best way to quickly determine what is wrong. Many deployments leave this checked all the time.
The general topic of viewing connected users is covered further in this article.
Tracking Abusive Users
On the Caster and Clients tab … is a small button marked “B” (for Banned) which provide a summary of any IP addresses which have connected to your Caster many times without every succeeding. You can read more about the threshold controls to manage such users in this article.


