Recommendations for automatically starting the SNIP NTRIP Caster application once the user has logged in. How to setup auto log-in to a given account is also covered. [Aside: It is preferred to have SNIP run as a service and then start that service before any party was logged in. However, because SNIP uses the desktop GUI, there are technical and security issues that prevent this solution at this time. The SNIP development team is still working to create a true service-based solution.]
Why do this
Why do this? If you have mounted SNIP on a machine that runs unattended, and one that may be restarted, and you ALWAYS want SNIP to start and run, you will want to use a solution such as this. [This article pertains to running SNIP in the Windows environment]
How to do this
This solution requires two additional steps beyond simply installing SNIP on the target machine.
- You must have the machine auto log-in to a given user account, the one that you routinely use to run SNIP. Because SNIP is being run as a desktop application and not a service, an active user logon is required in order to access the desktop services (and hence show the GUI display). You may wish to use an account created specifically for this purpose.
- You must create a shortcut in the startup folder for that account (or for all accounts if you prefer) to run the provided utility tool “SNIPserviceMon.exe” which is a console application we have created that checks to ensure SNIP is running and will restart SNIP if it finds it; a) not running or b) it is not responsive.
When the user first logs on, the SNIPserviceMon tool is started. It then checks the state of the SNIP application every 5 seconds thereafter. When the SNIPserviceMon tool sees that SNIP is not running, it starts the program (simpleNTRIP.exe). The small console window that shows the status of this can be minimized, but must remain running for the monitoring to continue. If you were to stop SNIP by hand, will will be restarted as long as this program is active. If you wish to no longer run SNIP, simply kill this program before exiting SNIP.
From SNIP release 2.09 onward (due to be released in May 2019) some additional functionality has been added to support this process as well. In particular when a forced shutdown occurs (Windows resetting, often due to service upgrades) SNIP now saves various intermediate files without operator intervention.
How to do this, step by step
In the example that follows we have used a Windows 7 machine for the example, other models of Windows are similar. The SNIPserviceMon tool is available for download at the link below for existing users, and will be bundled with all copies of SNIP from release 2.09 onward (May 2019 release). [Aside: This tool uses a simple console (in English: like SNIP, it has a GUI), therefore it cannot be run as a service and will fail if you try to run it in that manner.]
Note: This solution is intended for Windows 7, 8, and 10 users.
Set Auto Logon
In order for this to work, a user must be automatically logged in when the machine starts. There are many guides on how to do this for different widows platforms, here are several good ones:
- https://www.lifewire.com/how-do-i-auto-login-to-windows-2626066
- https://helpdeskgeek.com/how-to/log-into-windows-automatically/
- https://www.cnet.com/how-to/how-to-log-on-to-windows-7-automatically/
- https://support.microsoft.com/en-us/help/324737/how-to-turn-on-automatic-logon-in-windows
- https://www.groovypost.com/howto/automatically-sign-in-windows-10/
- https://www.technipages.com/how-to-enable-auto-login-in-windows-10
Any of the above can provide further details you may need.
We use Windows7 Pro in the below, using the Microsoft netplwiz utility to select which user account will be used for the the automatic log-in.
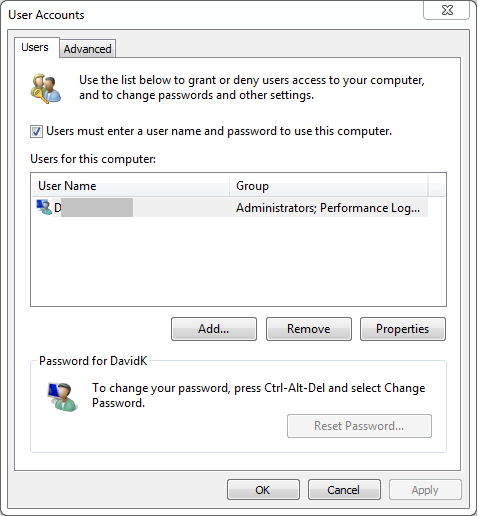
From the Start menu (or by typing the windows key + ‘R’), type in netplwiz and hit enter. This will bring up a dialog box similar to the below (again, using Windows 7 for this example).

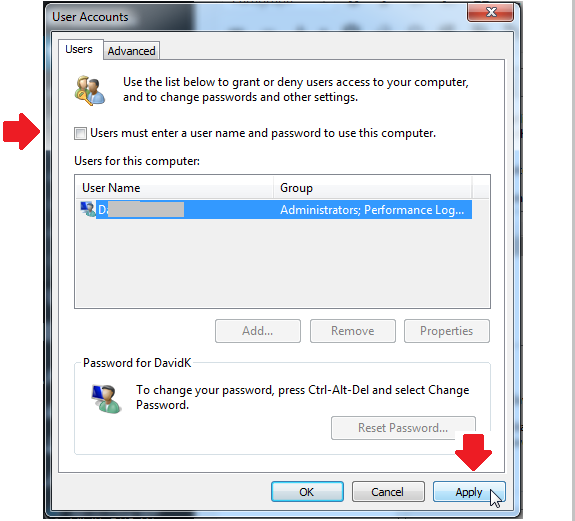
Uncheck the checkbox marked “Users must enter a user name and …” and then click the Apply button.

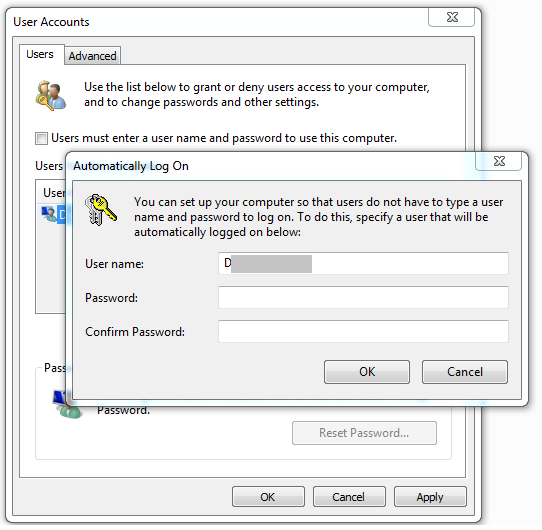
The dialog will immediately then ask you which user is to be the automatic one, and what the password is for that user.

Once this data is entered, a few minor registry things are safely edited by the Microsoft tools and from that point on this user will auto log-in when the machine starts. You can remove this at any time by re-checking the checkbox marked “Users must enter a user name and …” again.
Download and Installing SNIPserviceMon
The current release of the SNIPserviceMon.exe tool is Rev 1.1 and can be downloaded at this link:
Note: This tool now ships with all revision of SNIP, unless you
are re-installing it, you do not need to download it.
Unzip the tool and place it alongside the SNIP program in the /bin directory for SNIP.
For most users this would be the path: C:\Program Files (x86)\SNIP\bin
The tool depends on the SNIP program being called simpleNTRIP.exe and being in the same folder. If this file is not found, this is noted in the console display when run.
Now that the tool is installed, we must create a shortcut and place that shortcut into the “start” folder so that it will be automatically run with a user log-in occurs.
Starting SNIPserviceMon at login
We now create a shortcut to run the SNIPserviceMon tool at log-in. Note that the shortcut is not for SNIP itself but for the tool which will monitor and run SNIP.
Create a shortcut (not a copy) for SNIPserviceMon in the normal way (menu right-click, select create shortcut) and drag it to the desktop for convenience. You can rename this file anything you wish.
You can select where to place the shortcut in either a single users folder or in a special folder that applies to all users. Unless there are users who would be using the machine WITHOUT a need to ever run SNIP, we would recommend you place the shortcut into the special folder so that SNIP will automatically run with any user. The details regarding the name and location of the folder vary with the revision of Windows you are using (see the above links for each model of Windows).
The process of how to automatically start any program is also well covered by the internet, here are a few useful links for further background. [Remember, SNIP is not a service and cannot be started in that way.]
- https://www.howtogeek.com/228467/how-to-make-a-program-run-at-startup-on-any-computer/
- https://support.microsoft.com/en-us/help/4026268/windows-10-change-startup-apps
But first, as the startup folder is a “hidden” one on some systems, make sure you are showing hidden files in explorer.
To place the shortcut in the special folder (to apply to all users) do this:
From the Star menu (or by typing the windows key + ‘R’),
type in C:\ProgramData\Microsoft\Windows\Start Menu\Programs\Startup and hit enter.
Or, To place the shortcut in the current user’s startup folder do this:
From the Star menu (or by typing the windows key + ‘R’),
type in shell:startup and hit enter.
Caution: Please select one or the other locations for the shortcut, not both. If you were to use both methods (placing two shortcuts), two copies of the SNIPserviceMon tool would be started and running at the same time with each trying to start SNIP. Only one copy is needed.
The folder to use is then opened and visible. Simply drag the shortcut to the SNIPserviceMon tool created in the prior step (it should be on the desktop) into this folder. The machine may state you need admin privileges to move the file, allow it to do so. And you are done.
Important Note:
In the above you are placing a shortcut into the folder.
The SNIPserviceMon tool must be placed alongside the SNIP program in the /bin directory. The tool uses relative paths to find SNIP and other assorted files. The SNIP program itself must remain named simpleNTRIP.exe (and not, for example SNIP_2_xx or some such). The name of the folder where SNIP resides is not critical, and you can name that as you wish (some deployments choose to name the folder where each copy of SNIP resides by the release value). If the tool does not see a local copy of SNIP, it will alert you and suggest you configure it correctly.
Aside: A handy list of useful Windows shell commands can be found here.
Testing the result
Please perform these two steps to confirm your installation is now working.
Step One, test SNIPserviceMon and SNIP run
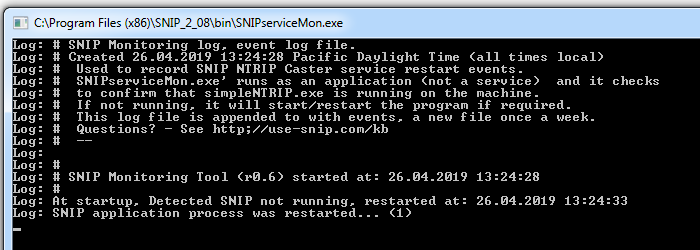
The very first time you run the program, a log file is also created:

Subsequent to the initial run, the console appears as below when started.

If you happen to have SNIP running right now, download the program as per above, place it in the /bin directory, and right click on it to run it. The program will then start, and you will a terse console similar to the above images. [If SNIP is not running, this will in fact start it if all is well]
At this point the SNIPserviceMon tool wakes and then checks to be sure a copy of SNIP is running once every 5 seconds. It then checks various time stamps on log files to confirm that SNIP is not in any sort frozen state. If it finds that the log files are evolving, all is well and it returns to sleep. If it does not find a copy running, it starts one and then waits to confirm it started correctly. If it find more than one copy running (this can occur when the user tries to start SNIP too many times), it kills all the copies and starts a single fresh instance. This process repeats forever unless the console is closed.
Test it. Close the copy of SNIP in the normal way. The SNIPserviceMon tool will notice this and take action. In a few seconds, typically about 10 as SNIP requires time to shut down and save various files after the GUI disappears, you will see SNIP restart. The console will display what occurred along with the date and time of the event.

In the above test you started the SNIPserviceMon tool by hand, confirmed it tracked SNIP in the process tables, and that is could restart SNIP.
If you see console text state that it cannot find SNIP, this indicates that you have not placed the SNIPserviceMon tool in the same /bin folder with the simpleNTRIP.exe program. Review the above instructions and correct.
Step Two, test Auto Log-in and SNIPserviceMon auto start
In order to test that this tool is automatically started when the user logs in you need to log out (or better yet restart the machine with this user set to auto log in). Simply log out or restart, and observe.
If all is well you will see the user desktop start without any intervention. This indicates the auto log-in process is working. Quickly thereafter you will again see a console image like the above appear. This indicates that the shortcut you placed into the START folder to the SNIPserviceMon tool is working.
After this point the process flow is identical to what you first tested, the SNIPserviceMon tool will detect the absence of a running copy of SNIP and restarts it when needed.
Congratulations, your copy of SNIP will now continuously run and restart without operator intervention!
Turning the Monitoring Service on or off
Once you have setup the service to run, you can…
- Disable the motioning program by simply killing the console window
- Enable (or restart) the service by running the program (double click on it)
Disable the motioning program before killing SNIP or SNIP may be restarted. To ensure that SNIP starts and shuts down correctly there are a few seconds of delay between the motioning program actions and SNIP becoming visible again.
A Caution
If running different copies of SNIP on the same machine, you may want to have a copy of the motioning program alongside each and only run one of these at any given time. The SNIP license model allows only one copy to run at a time, other copies are shut down when started to prevent conflicts. If you run multiple release copies of SNIP in different folder paths, these same rule applies.
